M A S T E R P A G E
Step 4:
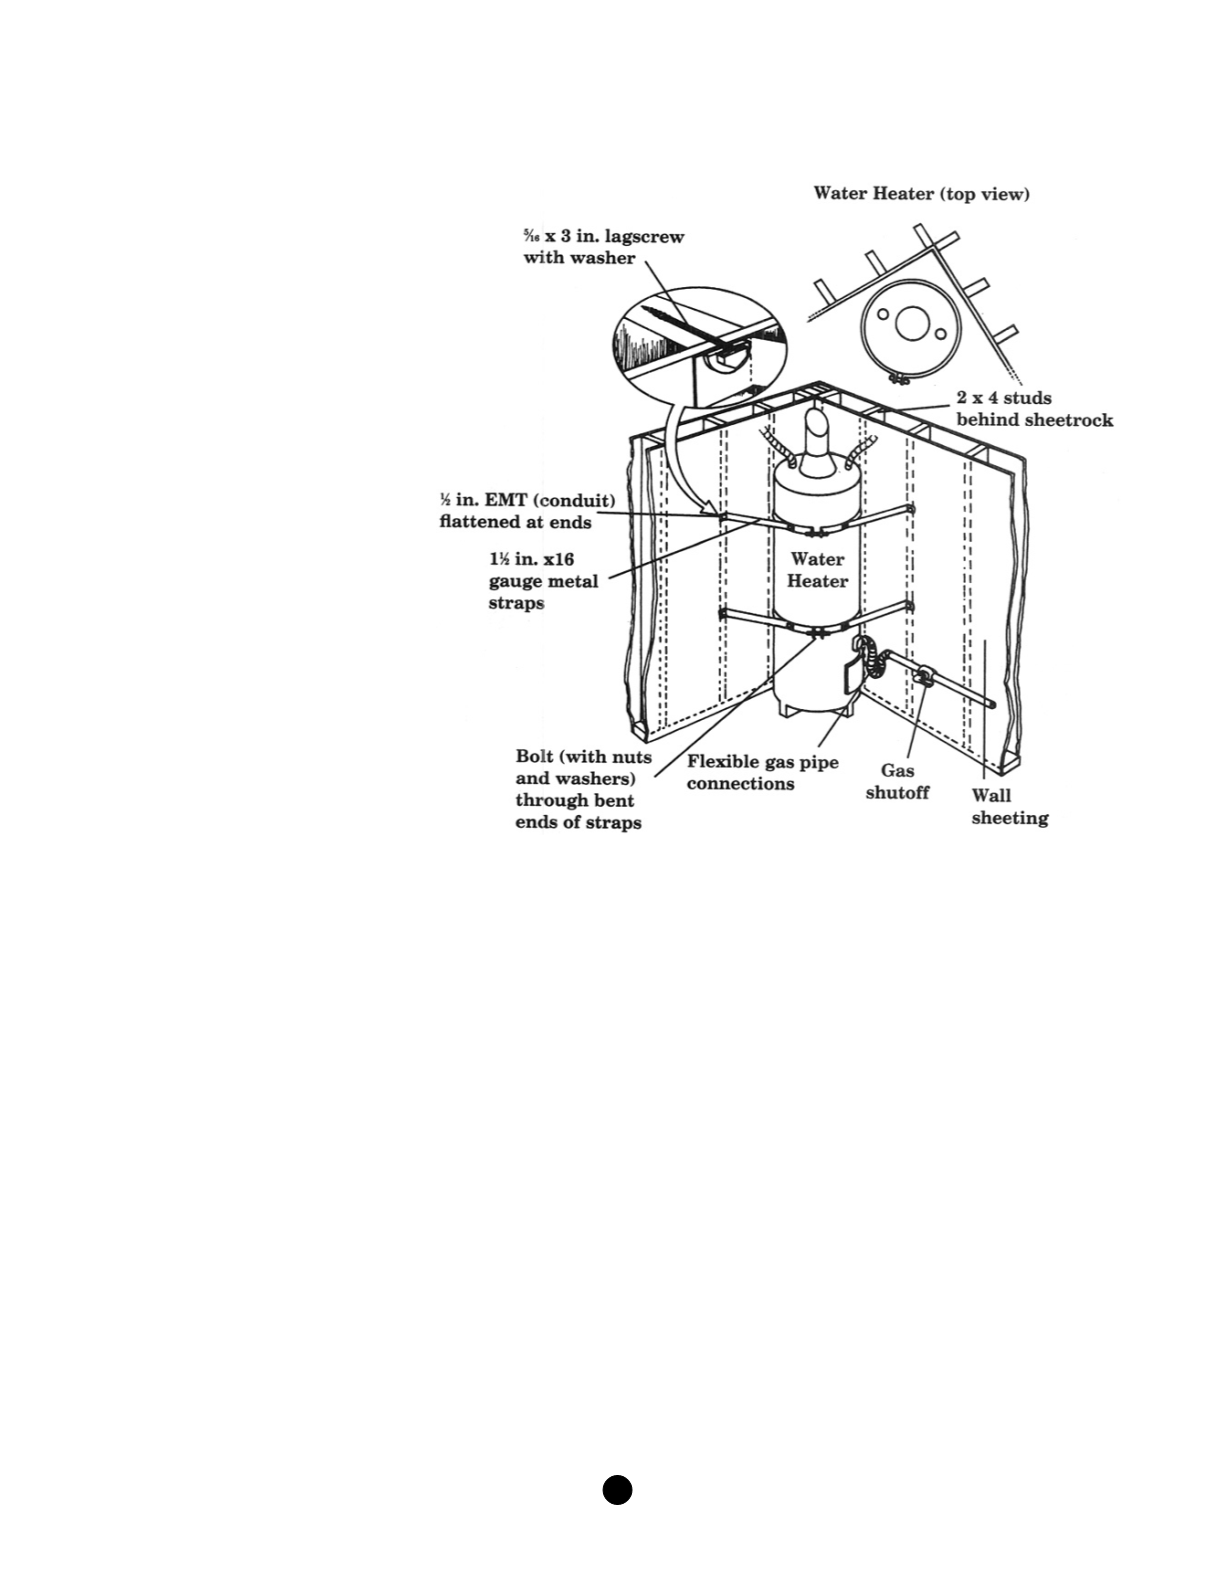
Strap Water Heater
Materials and Tools Needed
Q
Two 1.8 m (6 ft.) lengths of 4 cm (1.5 in.)
gauge pre-drilled strap
Q
One 3.1 m (10 ft.) length of 1 cm (.5 in.)
EMT tube (conduit)
Q
Four 1 cm x 7.5 cm (5/16 in. x 3 in.) lag
screws with washers
Q
Two 1 cm x 2 cm (5/16 in. x 3/4 in.) hex
head machine bolts with 1 nut and 2
washers each
Q
Two 1 cm x 3 cm (5/16 in. x 1-1/4 in.)
hex head machine bolts with 1 nut and 2
washers each
Q
Electric drill
Q
Tape measure
Q
Hammer
Q
Hacksaw
Q
Crescent wrench
Q
Vise or clamp
Q
Power drill
Q
1 cm (3/8 in.) drill bit
Q
Center punch
Installation Instructions for Step 4
1. Mark water heater at 15 cm (6 in.) from
top and about 46 cm (18 in.) up from
bottom. Transfer these marks to the wall.
Locate the studs in the wall on both sides of
the water heater.
2. Drill a 0.5 cm (3/16 in.) hole 7.5 cm (3 in.) deep through the wall sheathing and into the center of the wood studs at the four marks made
in step 1.
3. Measure around the water heater and add 7.5 cm (3 in.) to the measurement. Using a hacksaw, cut the two 4 cm (1.5 in.) 16-gauge metal
straps to this length for encompassing water heater.
4. Mark 4 cm (1.5 in.) from each end of metal straps, insert them in a vise, and bend the ends outward to approximately a right angle. Bend
the straps into a curve.
5. Measure the distance from a point midway on each side of the water heater to the hole drilled in the wan (probably two different
lengths). Add 4 cm (1.5 in.) to these measurements. Using a hacksaw, cut two pieces of tube to each of these two lengths.
6. Using a hammer, flatten approximately 4 cm (1.5 in.) at each end of the four pieces of tubing by laying the tube on a flat metal or
concrete surface and striking with the hammer. Be sure you flatten both ends on the same plane.
7. Insert the flattened ends of the tubes, one at a time, into a vise or clamp. With the hammer and center punch make a mark 2 cm (3/4")
from each end at the center of the flattened area of the tube. Drill 1 cm (3/8 in.) holes in each end of all four tubes (8 holes). Be sure tubes
are clamped down while drilling. Bend each end to about 45 degrees.
8. Wrap the straps around the heater and insert a 1 cm x 3 cm (5.16 in. x 1.25 in.) bolt with washers into the bent ends. Tighten nuts with
fingers. Insert 1 cm x 2 cm (5/16 in. x 3/4 in.) bolts through straps from the inside at the mid-point on each tube strut and insert on hole in
the wall stud. You may need to tap the lag screw gently into the hole to start it, then tighten with crescent wrench.
9. Adjust the straps to the proper height and tighten nuts snugly. If the nuts are too tight, the straps could tilt the heater.
Note:
Flexible gas and water supply lines to the water heater will greatly reduce the danger of water pipe leaks and fire or explosion from
a gas leak after an earthquake. If your water heater does not have a flexible gas line, contact a licensed plumber to install one. These
instructions are for a 30 to 40 gallon water heater within 30.5 cm (12 in.) of a stud wall.
A G U
/
F E M A
310
S
E I S M I C
S
L E U T H S


